
Although the application itself requires no installation procedure (just unzip the download and place it in whatever directory you want - C:\Program Files\MaestroDBQ? Running it will automatically setup the sub-directories if they're not already present), there are however, one or two steps you'll have to complete before it all hangs together like a finely greased Lara Croft t-shirt. Just follow these simple steps with your TWS Admin and all should be fine and dandy.
![]()
If you're wondering why it was done this way, then the simple answer is, it was easiest! Not really having a TWS development system in place, I didn't want to go the route of dabbling in accessing live TWS databases. Also didn't have the time to start developing agents and live communications. Maybe for future development, but as it stands now, MaestroDBQ gets its info via FTP'd database extracts taken from the Masterdm. You can run these extracts as and when, and MaestroDBQ when prompted, will always retrieve your latest extract and update itself. Anyway, back to the installation instructions...
![]()

![]()
Step 1 : Create a TWS Extract Script
The TWS Administrator needs to create a script on the TWS Master Domain which, when run, extracts the relevant database data into standard TWS text format. Call the script something like "Maestro_DBXtract.sh" and place it somewhere the standard TWS "maestro" User has access to.
![]()
Eg. "/scheduler/maestro/scripts/Maestro_DBXtract.sh"
![]()
For UNIX systems, the script should have its executable "X" flag set (chmod +X) and be accessible via User "maestro" (chown maestro:unison - assuming you have the default TWS username "maestro"). If your Master is NT/Intel-based, then similar script and access rights should be employed. Don't worry if none of this makes any sense to you, as your Intel/Unix/TWS Admin will understand (hopefully).
![]()
Here is the necessary AIX Unix (K-Shell) code to place in the script:
![]()
#!/bin/ksh
rm /scheduler/maestro/DBXtract/*.Xtract
Upath=/scheduler/maestro/DBXtract
ExeName=/scheduler/maestro/bin/composer
SchName=${Upath}/Schedules.Xtract
JobName=${Upath}/Jobs.Xtract
CalName=${Upath}/Calendars.Xtract
CpuName=${Upath}/Cpus.Xtract
ParName=${Upath}/Parms.Xtract
ProName=${Upath}/Prompts.Xtract
ResName=${Upath}/Resources.Xtract
$ExeName create ${SchName} from sched=@#@
$ExeName create ${JobName} from jobs=@#@
$ExeName create ${CalName} from calendars
$ExeName create ${CpuName} from cpu=@
$ExeName create ${ParName} from parms
$ExeName create ${ProName} from prompts
$ExeName create ${ResName} from resources
![]()
![]() To download txt version, right-click and select "Save As..."
To download txt version, right-click and select "Save As..."
![]()
If you run the above script (as a suitable User ie. "maestro"), then all the necessary files required by MaestroDBQ should be in your output directory ready for FTP (whatever you've called it in the "Upath" parameter in the script. Remember: you will probably need to adjust it if running on a platform other than AIX Unix (K-Shell) - please check your TWS Admin Guide for details - as long as it extracts in TWS format, all the following files...
![]()
Eg.
![]()
-rw-rw-rw- 1 maestro unison 17858 Mar 24 11:50 Calendars.Xtract
-rw-rw-rw- 1 maestro unison 6634 Mar 24 11:50 Cpus.Xtract
-rw-rw-rw- 1 maestro unison 858726 Mar 24 11:50 Jobs.Xtract
-rw-rw-rw- 1 maestro unison 693 Mar 24 11:50 Parms.Xtract
-rw-rw-rw- 1 maestro unison 216 Mar 24 11:50 Prompts.Xtract
-rw-rw-rw- 1 maestro unison 367 Mar 24 11:50 Resources.Xtract
-rw-rw-rw- 1 maestro unison 407571 Mar 24 11:50 Schedules.Xtract
![]()
Test it!
![]()
![]()
Step 2 : Create A TWS Job To Run Your Script
Job: MAESTRO_DBXTRACT
![]()
Runs: "/scheduler/maestro/scripts/Maestro_DBXtract.sh"
![]()
The above command-line for your job uses the example naming and destination suggestions above, so remember to adjust if you've used alternatives. Also set this job to be run as a TWS User with access-rights to the TWS Database (ie. "maestro").
![]()
Test it!
![]()
![]()
Step 3 : Create TWS Schedule To Automate The Above Job
Eg.
![]()
SCHEDULE MASTERDM#DBQ_EXTRACT
ON REQUEST
ON EVERYDAY
AT 1800
:
MASTERDM#MAESTRO_DBXTRACT
END
![]()
The above Schedule "DBQ_EXTRACT" will run the extract script everyday at 6:00pm, as well as allowing ad-hoc execution.
![]()
Test it!
![]()
![]()
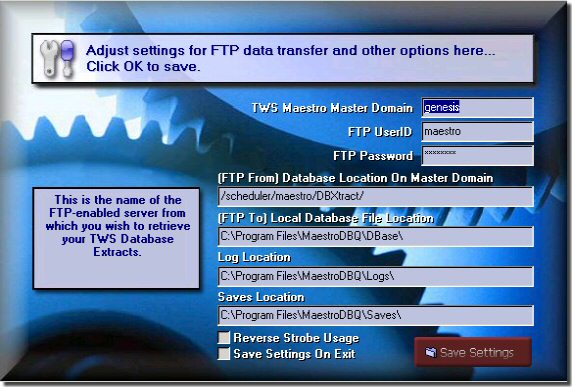
Step 4 : Set Up FTP Details Within MaestroDBQ
Open the "Settings" dialog, and enter the necessary FTP access details to the extracted files created by the script in Step #1. You'll need the name of the Workstation/Domain the extract runs on; the FTP Userid and Password, and the location of the extracted files from Step #1.
![]()
![]()
Now when you select the Menu option to "Run FTP Batch Update", MaestroDBQ should connect to your Master Domain and retrieve the necessary extracts you've created by running the extract script/schedule, after which it should automatically update and be ready for use. The connection to the Master Domain is via FTP only to a single directory, so FTP has to be enabled (if not already), and access-rights to your script extract directory granted. No other connection is made, and you should see the FTP window appear briefly during the transfer.
![]()
You can now run the extract schedule within TWS, then the FTP transfer within MaestroDBQ as and whenever to get the latest info.
![]()
As mentioned, the reason for doing it this way, is one of simplicity. It also prevents damage to the live TWS database, as well as making the data accessible (local) even if you're not connected to the network. Who knows? Maybe a future release may see it done differently... ;)
![]()
Any problems, please feel free to ask.
![]()